
Amazon Cognito user pool to manage your users’ accounts. You’ll deploy pages that enable customers to register as a new user, verify their email address, and sign into the site.
Architecture Overview
When users visit your website they will first register a new user account. We’ll only require them to provide an email address and password to register. However, you can configure Amazon Cognito to require additional attributes in your own applications.
After users submit their registration, Amazon Cognito will send a confirmation email with a verification code to the address they provided. To confirm their account, users will return to your site and enter their email address and the verification code they received. You can also confirm user accounts using the Amazon Cognito console, if you want to use fake email addresses for testing.
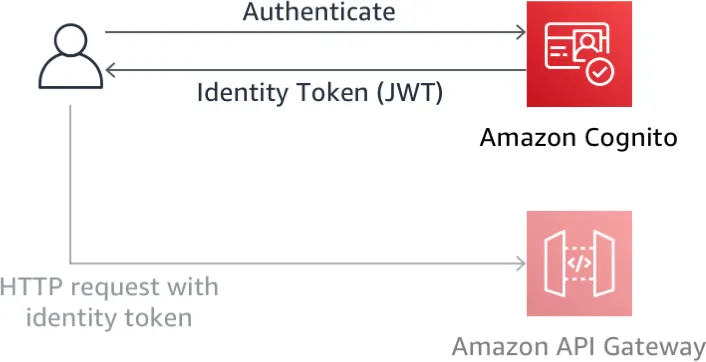
After users have a confirmed account (either using the email verification process or a manual confirmation through the console), they will be able to sign in. When users sign in, they enter their username (or email) and password. A JavaScript function then communicates with Amazon Cognito, authenticates using the Secure Remote Password protocol (SRP), and receives back a set of JSON Web Tokens (JWT). The JWTs contain claims about the identity of the user and will be used in the next module to authenticate against the RESTful API you build with Amazon API Gateway.
Implementation Instructions
Each of the following sections provides an implementation overview and detailed, step-by-step instructions. The overview should provide enough context for you to complete the implementation if you’re already familiar with the AWS Management Console or you want to explore the services yourself without following a walkthrough.
1. Create an Amazon Cognito User Pool
Amazon Cognito provides two different mechanisms for authenticating users. You can use Cognito User Pools to add sign-up and sign-in functionality to your application or use Cognito Identity Pools to authenticate users through social identity providers such as Facebook, Twitter, or Amazon, with SAML identity solutions, or by using your own identity system. We’ll use a user pool as the backend for the provided registration and sign-in pages.
Use the Amazon Cognito console to create a new user pool using the default settings. Once your pool is created, note the Pool Id.
✅ Step-by-step directions
- Go to the Amazon Cognito Console
- Choose Manage your User Pools.
- Choose Create a User Pool
- Provide a name for your user pool, then select Review Defaults
- On the review page, click Create pool.
- Note the Pool Id on the Pool details page of your newly created user pool.
2. Add an App Client to Your User Pool
From the Amazon Cognito console select your user pool and then select the App clients section. Add a new app and make sure the Generate client secret option is deselected. Client secrets aren’t supported with the JavaScript SDK. If you do create an app with a generated secret, delete it and create a new one with the correct configuration.
✅ Step-by-step directions
- From the Pool Details page for your user pool, select App clients from the General settings section in the left navigation bar.
- Choose Add an app client.
- Give the app client a name.
- Uncheck the Generate client secret option. Client secrets aren’t supported for use with browser-based applications.
- Choose Create app client.
- Note the App client id for the newly created application.
3. Update the config.js File in Your Website
The /js/config.js file contains settings for the user pool ID, app client ID and Region.
✅ Step-by-step directions
1.Open js/config.js
2. update the cognito section with the correct values for the user pool and app you just created. You can find the value for userPoolId on the Pool details page of the Amazon Cognito console after you select the user pool that you created. You can find the value for userPoolClientId by selecting App clients from the left navigation bar. Use the value from the App client id field for the app you created in the previous section.
The value for region should be the AWS Region code where you created your user pool. E.g. us-east-1 for the N. Virginia Region, or us-west-2 for the Oregon Region. If you're not sure which code to use, you can look at the Pool ARN value on the Pool details page. The Region code is the part of the ARN immediately after arn:aws:cognito-idp:.
The updated config.js file should look like this. Note that the actual values for your file will be different:
window._config = {
    cognito: {
        userPoolId: 'us-west-2_uXboG5pAb', // e.g. us-east-2_uXboG5pAb
        userPoolClientId: '25ddkmj4v6hfsfvruhpfi7n4hv', // e.g. 25ddkmj4v6hfsfvruhpfi7n4hv
        region: 'us-west-2' // e.g. us-east-2
    },
    api: {
        invokeUrl: '' // e.g. https://rc7nyt4tql.execute-api.us-west-2.amazonaws.com/prod,
    }
};
3. Save the modified file making sure the filename is still config.js.
⭐️ Recap
🔑 Amazon Cognito provides two different capabilities for managing users, federated identities and user pools. Amazon Cognito user pools can handle almost every aspect about managing users, their login credentials, handling password resets, multifactor authentication and much more!
Extra
- Try copying the auth_token you’ve received and paste that into an online JWT Decoder to understand what this token means for your application