
Amazon Nova is AWS’s latest family of foundation models built to handle a wide range of AI tasks. Whether you need a lightweight, text-only model like Nova Micro, or more advanced options such as Nova Pro and Nova Premier for working across text, images, and video, Nova offers strong performance at practical, cost-effective pricing.
Molt Bot (formerly Clawdbot) is an open-source AI assistant that works seamlessly with Amazon Bedrock. When paired with Amazon Nova models, it allows you to run a fully capable AI assistant powered entirely by AWS-native technology.
In this guide, you’ll learn how to set up Molt Bot with Amazon Nova using either AWS access keys or an AWS profile, so you can start running your own AI assistant with confidence.
Prerequisites
Before getting started, make sure you have:
An active AWS account
Node.js v24 or later installed on your system
Amazon Nova 2: Model Overview
Amazon Nova comes in two generations of foundation models. Nova 2 is the latest release, offering improved reasoning, deeper contextual understanding, and built-in tools for more advanced AI workflows. Earlier Nova models are still supported and can be used for existing applications.
Nova 2 Models (Latest)
Amazon Nova 2 is the newest generation of Nova models, designed for better reasoning, longer context handling, and more intelligent agent workflows.
Nova 2 Lite
Model ID: amazon.nova-2-lite-v1:0
Input: Text, Images, Video, Documents
Output: Text
Context Length: Up to 1 million tokens
Best suited for: High-volume, cost-efficient, multimodal AI agents that require extended thinking and long-context understanding
Key Features of Nova 2
Extended thinking
Advanced reasoning capabilities with three levels of thinking intensity, ideal for solving complex, multi-step problems.
Built-in tools
Includes web grounding for accessing real-time information and a Python code interpreter for executing and validating logic.
Optimized for AI agents
Improved tool usage, better memory handling, and stronger context retention for agent-driven workflows.
Enhanced document understanding
More accurate processing of large documents, including tables, charts, and multi-page files.
Step 1: Create an IAM User
To allow Molt Bot to access Amazon Bedrock, you’ll first need to create an IAM user in AWS.
Open the AWS Management Console and navigate to IAM
From the left sidebar, click Users
Select Create user and enter a username (for example, MoltBot)
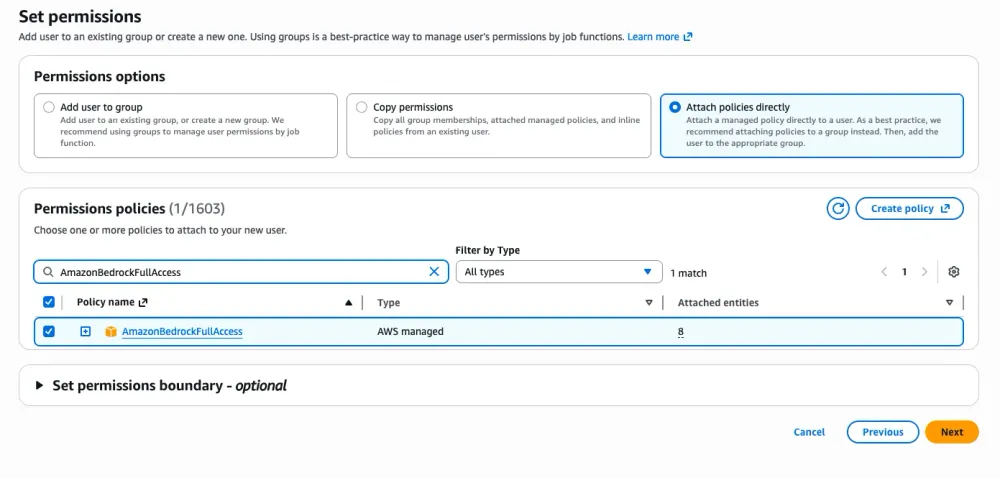
Choose Attach policies directly
From the list of permission policies, select AmazonBedrockFullAccess
Click Next, then review the details
Click Create user to finish
Step 2: Create Access Keys
Next, you’ll create access keys so Molt Bot can authenticate with AWS.
In the IAM user details page, open the Security credentials tab
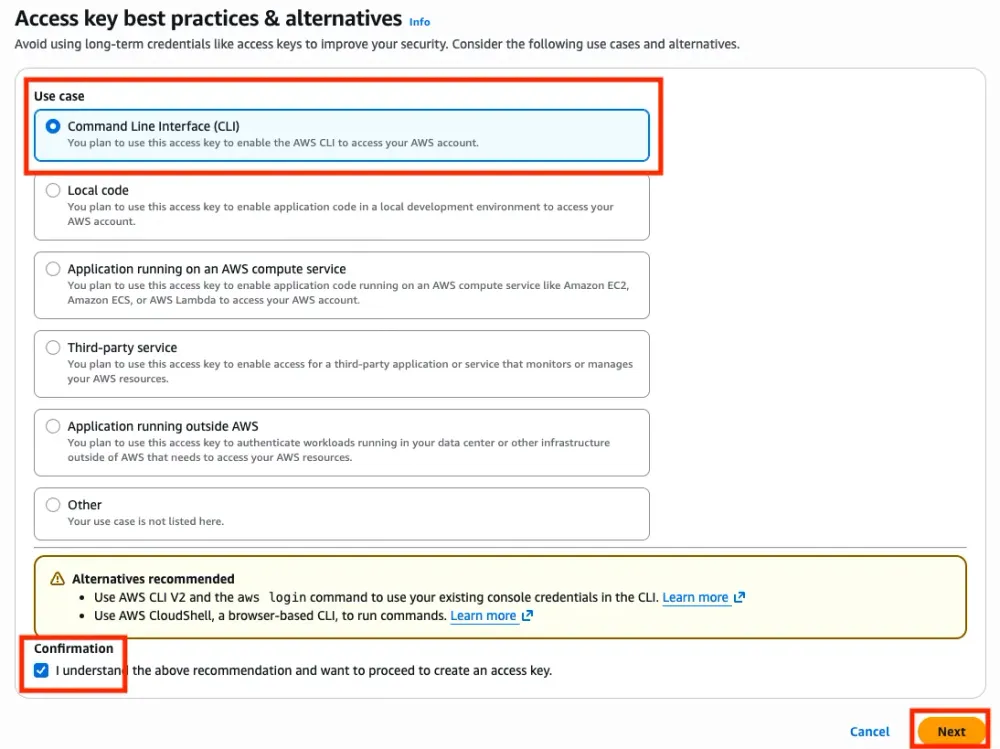
Scroll down to the Access keys section and click Create access key
Select Command Line Interface (CLI) as the use case
Tick the confirmation checkbox and click Next
Click Create access key
Download the CSV file or securely copy the Access Key ID and Secret Access Key
⚠️ Important: This is the only time you’ll see the Secret Access Key. Make sure to store it securely, as it cannot be retrieved later.


Step 3: Install & Onboard Molt Bot (Clawdbot)
First, make sure Node.js is installed on your system.
Verify Node.js installation:
node --version
If Node.js v24 or later is installed, you’re good to go.
Install Molt Bot (Clawdbot)
Install the Molt Bot CLI globally using npm:
npm install -g clawdbot@latest
⚠️ Important: As of 27 Jan 2026, the npm package is still published under the name clawdbot. Use clawdbot for all commands until the package name is officially updated to moltbot.
Verify the Installation
clawdbot --version
If the version prints correctly, the installation was successful.
Run the Onboarding Wizard
Start the onboarding process:
clawdbot onboard --install-daemon
This launches an interactive setup wizard. Follow these steps when prompted:
Accept the security notice
Choose Manual onboarding mode
Select Local gateway (this machine)
Set your workspace directory
Skip model and authentication provider setup for now
When filtering models by provider, select amazon-bedrock
Choose a default model (for example:
amazon-bedrock/amazon.nova-lite-v1:0)
Accept the default gateway settings
(Port: 18789, Loopback only)
Complete the remaining prompts
When asked to hatch your bot, select “Do this later” if you prefer to finish configuration afterward
At this point, Molt Bot is installed and onboarded locally. In the next step, you’ll connect it to AWS and Amazon Nova to bring your AI assistant fully online .
Step 4: Configure AWS Credentials
Molt Bot (Clawdbot) loads AWS credentials from an environment file located at
~/.clawdbot/.env.
You can configure this using AWS access keys (recommended for simplicity).
Option A: Use AWS Access Keys
Create the .env file and add your AWS credentials:
cat > ~/.clawdbot/.env << 'EOF'
# AWS credentials for Amazon Bedrock
AWS_ACCESS_KEY_ID=your-access-key-id-here
AWS_SECRET_ACCESS_KEY=your-secret-access-key-here
AWS_REGION=us-east-1
EOF
Replace:
your-access-key-id-here with your AWS Access Key ID
your-secret-access-key-here with your AWS Secret Access Key
Make sure the region matches the region where Amazon Bedrock and Nova models are available (for most setups, us-east-1 works well).
Once this file is saved, Molt Bot will automatically pick up these credentials when it starts.
In the next step, you’ll launch the bot and verify that it can successfully connect to Amazon Nova
Option B: Use an AWS Profile
If you already have the AWS CLI configured with one or more profiles (stored in ~/.aws/credentials), you can use a profile instead of hardcoding access keys.
Create or update the Molt Bot environment file:
cat > ~/.clawdbot/.env << 'EOF'
# AWS credentials for Amazon Bedrock
AWS_PROFILE=your-profile-name
AWS_REGION=us-east-1
EOF
Replace your-profile-name with the name of the AWS profile you want Molt Bot to use.
This approach is often preferred for local development, as it avoids storing access keys directly in the .env file while still allowing Molt Bot to authenticate with Amazon Bedrock.
Step 5: Add Nova 2 Lite to clawdbot.json
Now that Molt Bot is authenticated with AWS, you need to register the Amazon Nova 2 Lite model in its configuration.
Open the Molt Bot configuration file:
nano ~/.clawdbot/clawdbot.json
Add the following models configuration under the models section:
{
  "models": {
    "providers": {
      "amazon-bedrock": {
        "baseUrl": "https://bedrock-runtime.us-east-1.amazonaws.com",
        "api": "bedrock-converse-stream",
        "auth": "aws-sdk",
        "models": [
          {
            "id": "us.amazon.nova-2-lite-v1:0",
            "name": "Amazon Nova 2 Lite (US Inference Profile)",
            "reasoning": false,
            "input": ["text", "image"],
            "cost": { "input": 0, "output": 0, "cacheRead": 0, "cacheWrite": 0 },
            "contextWindow": 300000,
            "maxTokens": 8192
          }
        ]
      }
    }
  }
}
⚠️ Important
Do not replace the entire file.
Instead, merge this configuration into your existing clawdbot.json.
Once merged, your file will look similar to the example below (with your existing settings preserved):
{
  "messages": {
    "ackReactionScope": "group-mentions"
  },
  "models": {
    "providers": {
      "amazon-bedrock": {
        "baseUrl": "https://bedrock-runtime.us-east-1.amazonaws.com",
        "api": "bedrock-converse-stream",
        "auth": "aws-sdk",
        "models": [
          {
            "id": "us.amazon.nova-2-lite-v1:0",
            "name": "Amazon Nova 2 Lite (US Inference Profile)",
            "reasoning": false,
            "input": ["text", "image"],
            "cost": { "input": 0, "output": 0, "cacheRead": 0, "cacheWrite": 0 },
            "contextWindow": 300000,
            "maxTokens": 8192
          }
        ]
      }
    }
  },
  "agents": {
    "defaults": {
      "maxConcurrent": 4,
      "subagents": {
        "maxConcurrent": 8
      },
      "compaction": {
        "mode": "safeguard"
      },
      "workspace": "/Users/yungjunyong/clawd",
      "model": {
        "primary": "amazon-bedrock/us.amazon.nova-2-lite-v1:0"
      },
      "models": {
        "amazon-bedrock/us.amazon.nova-2-lite-v1:0": {}
      }
    }
  },
  "gateway": {
    "mode": "local",
    "auth": {
      "mode": "token",
      "token": "undefined"
    },
    "port": 18789,
    "bind": "loopback"
  }
}
This ensures Nova 2 Lite is available as the default model for your AI assistant.
Step 6: Restart the Gateway
After updating the configuration, restart the Molt Bot daemon so the changes take effect:
clawdbot daemon restart
Step 7: Verify the Setup
To confirm that Molt Bot can see and authenticate the Amazon Nova model, list the available models:
clawdbot models list
You should see output similar to this:
| Model | Input | Context | Local | Auth | Tags |
| amazon-bedrock/us.amazon.nova-2-lite-v1:0 | text + image | 31k | No | Yes | default, configured |
The Auth: yes column confirms that your AWS credentials are working correctly.
To view all available Amazon Bedrock models, run:
clawdbot models list --all
Step 8: Start Using Molt Bot
You’re all set 🎉
Now you can start interacting with your AI assistant.
Launch the terminal UI:
clawdbot tui
Or send a message directly from the command line:
clawdbot agent --message "Which AI model is powering you?"
Your Molt Bot is now running locally, powered by Amazon Nova 2 Lite on Amazon Bedrock.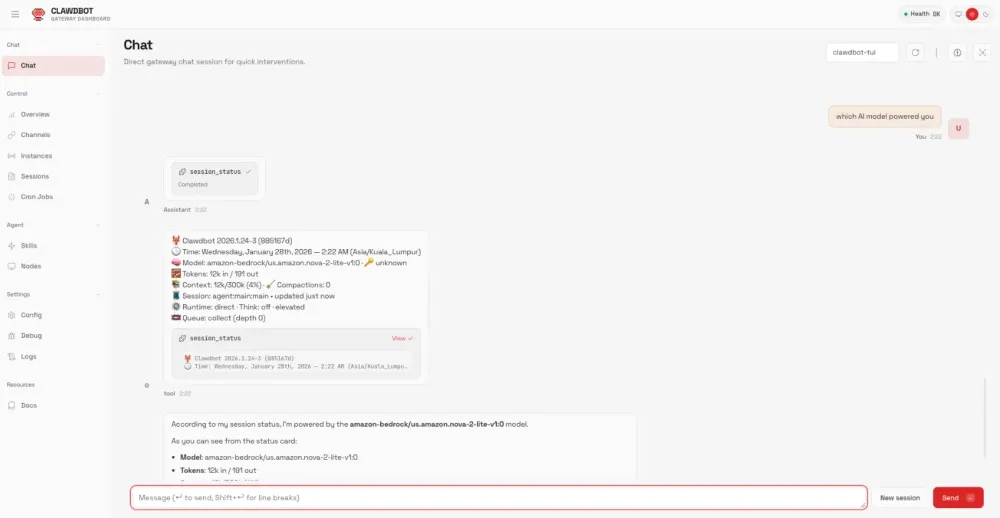
Changing the Default Model
If you want to switch Molt Bot to a different model (for example, Claude Opus 3), you can update the default model with a single command:
clawdbot config set agents.defaults.model.primary "amazon-bedrock/anthropic.claude-3-opus-20240229-v1:0"
This makes the new model your primary AI for all interactions.
Conclusion
Congratulations! You now have a fully functional AI assistant powered by Amazon Nova. Using Molt Bot with Amazon Nova gives you:
AWS-native AI – fully built and optimized for Amazon Bedrock
Data sovereignty – all inference happens securely within your AWS account
Flexible pricing – choose the Nova model that fits your workload and budget
Multimodal capabilities – process text, images, and video with Nova Lite, Pro, or Premier
Enterprise-ready – leverage IAM, VPC, and CloudTrail for governance and compliance
From here, you can take Molt Bot further by integrating messaging platforms like Telegram, Slack, or Discord, adding scheduled tasks, memory persistence, and custom skills.
For more advanced configurations, check out the full documentation at docs.molt.bot.